A micrometer is one of the most popular measuring tools. The micrometer was invented in 1844. The micrometer has been used for measurements for a long time. Now it is one of the most accurate measuring instruments. What elements is a micrometer made of? What steps should be taken before easurement? And most importantly, how to measure with a micrometer.
Micrometer – what is it?
A micrometer is a measuring tool used to make accurate measurements of components. When taking measurements with a micrometer, you measure with a very high accuracy of 0.01 – 0.001 mm. Thanks to the micrometer, which is characterized by easy construction and simple operation, you can perform precise measurements with very high accuracy. Sometimes a caliper may prove to be an insufficient measuring device. Then a micrometer will be a sufficient solution.
Depending on the structure, micrometers allow us to measure:
- internal messurements,
- External measurements,
- depth,
- diameter,
- wall thickness.
Micrometers can also be divided into digital micrometers and analog micrometers. Micrometers are available with different measurement ranges: 0÷25 mm, 25÷50 mm, 50÷75 mm and so on, every 25 mm.
Micrometer – how it is constructed
What elements is a micrometer made of? The micrometer consists of the following elements:
- bail,
- anvil,
- spindle,
- sleeve,
- drum,
- clutch,
- caliper (brake),
- micrometer screw.

The sleeve is used to read the results. There is a main scale on the sleeve. The main (horizontal) scale, depending on the type of micrometer, has a scale at the top or bottom ranging from 1 mm and every 0.5 mm. The drum is used to read the results. The drum circumference is divided into 50 parts every 0.01 mm. A measuring element is placed between the anvil (stationary part) and the spindle (moving part).
It is also worth mentioning about measuring surfaces. Measuring surfaces are places of contact with the measured object. The measuring surfaces are made of sintered carbide to ensure wear resistance.
The clutch is used to reach the element. Thanks to the micrometer screw, you can perform measurements with high accuracy and with constant pressure. This is a characteristic feature of a micrometer.
Another interesting fact is that the micrometer meets Abbe’s Postulate, which tells us that maximum accuracy is obtained when the instrument axis and the measurement axis are mutual, meaning that they are in one line. This will make your measurements reliable and accurate. Please note that the caliper does not meet this requirement.
The micrometer also has a brake that prevents it from changing position. When you lock the brake and turn the micrometer screw, you will hear a characteristic sound. It is a rattle. At this point it means STOP! Do not turn the screw any further. The bow is the element of the micrometer that connects the other elements. Additionally, the micrometer has a thermal insulating cover that protects against heat transfer from the hand to the bezel. Additionally, it will be convenient for you to use a tripod when taking measurements.
Micrometer – the most common mistakes
Unfortunately, you can make mistakes when taking measurements with a micrometer. When you take a measurement, you can measure the chord instead of the diameter. Quite common mistakes include incorrect reading of values. When you read the measurement result at an angle instead of straight ahead.
Micrometer – what to do before measurement?
Before measuring with a micrometer, you must check whether the instrument has a current calibration certificate. Even for a new device you should have a quality certificate.
Before measuring, you can inspect it yourself. What should be checked? First check the measuring surfaces. Check whether they are damaged, dirty or corroded. Check the spindle travel and readability of the line.
In the case of an electronic micrometer, check the readability of the display and whether all buttons work. The next step you should take is to check it it is ‘zero-ed’. If, after turning the micrometer, the lines do not line up with 0, you can correct it using the key that is included in the set. On the back of the micrometer, on the sleeve, there is a a hole that is used for positioning 0. Use the wrench to move the sleeve until the lines align.
Micrometer – how to measure?
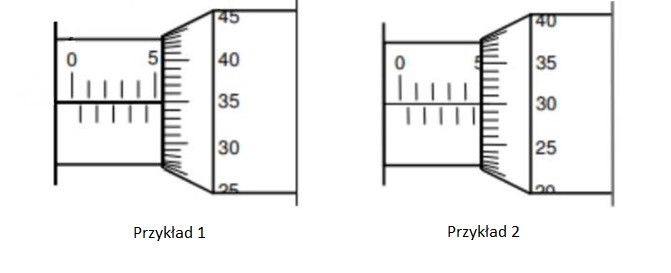
When you want to take a measurement with a micrometer, you need to place the object between the anvil and the spindle. Then gently tighten the drum and clutch until you hear a characteristic sound. When reading a result from a micrometer, you should read the result by holding the micrometer in front of you. The main (horizontal) scale, depending on the type of micrometer, has 1 mm and 0.5 mm scales at the top or bottom. However, you read the hundredths of a millimeter from the scale on the drum. The value you read from the drum coincides with the line. Example 1 – measurement is 5.35 mm. Example 2 – measurement is 4.80 mm.
Storage and maintenance
The micrometer should be stored in a suitable box. Do not turn the surface edges all the way. The micrometer should also be calibrated.
Summary
Use a micrometer to take accurate measurements of objects. You can choose from analog micrometers and electronic micrometers with a display. Also, depending on the feature you are measuring, you can use a micrometer adapted to it (e.g. a micrometer for external or internal measurements). When measuring with a micrometer, you will get a result with an accuracy of up to 0.001 mm.